
Mount Brew & Brew Lake Hut – Winter Route Guide Via Roe Creek FSR
Mount Brew / Brew Hut is a beautiful destination between Brandywine and Roe Creek. It’s located just west, up and around from Brew Lake. Brew is a beautiful spot that is accessible year round, located between Squamish & Whistler.
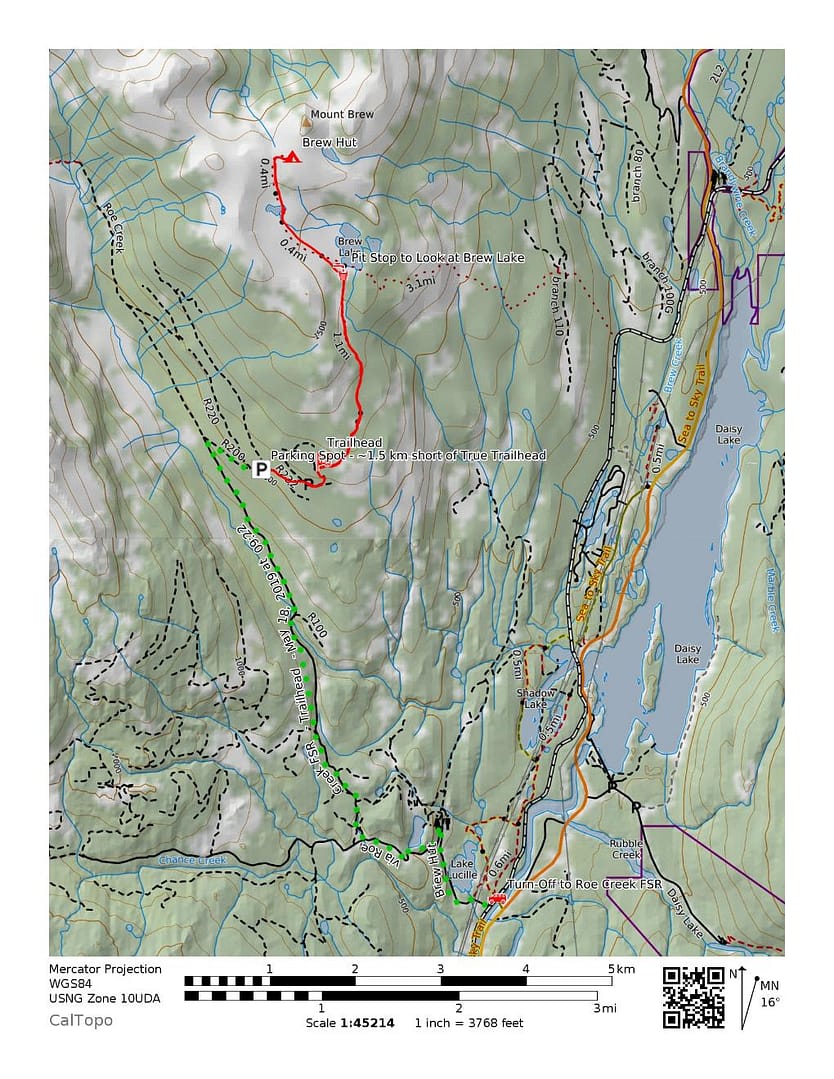
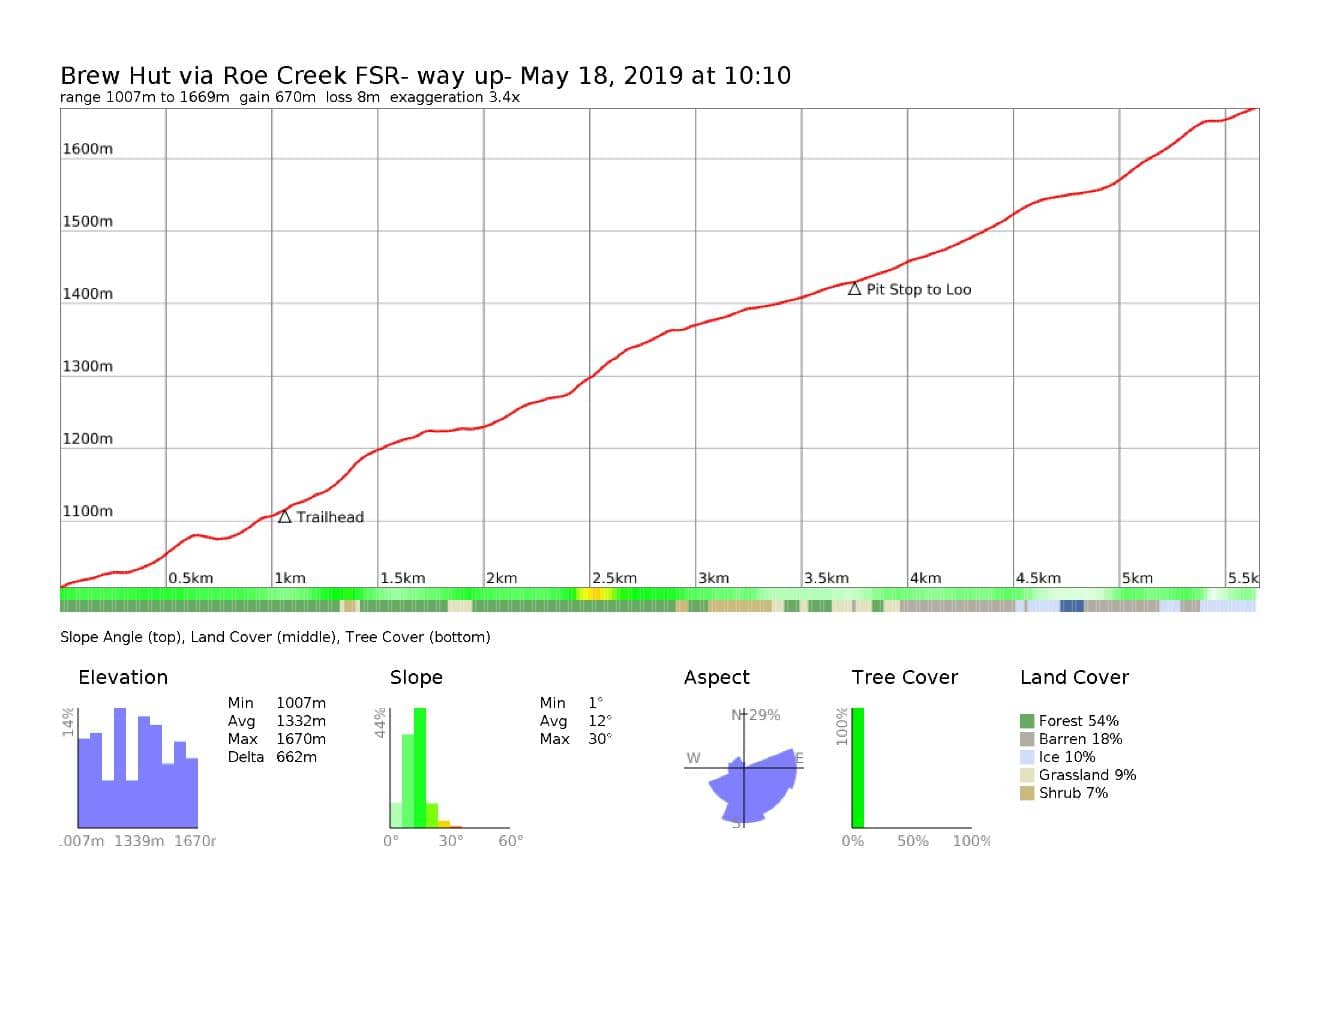
Quick Summary – 6.5 km of magic. First 3km you’re in the forest until you reach the lake. Balance of the distance is exposed with gorgeous views of Garibaldi Park as you climb up to the hut. 4×4 high clearance required on Roe Creek FSR with many washouts towards the trailhead. With snow covering the landscape, flagging is hidden and the trail is unmarked.
Distance: 11.3 KM Roundtrip from where we parked; 5.6km up/ 5.6 km down; a couple of sketchy washouts between where we parked & the trailhead we opted to not cross (Factor ~9km on the logging roads)
Time: Allow 3.5-5 hours up/ 2.5-4 hours down + Factor in 45-1 hr each way on the Forestry Road (HK Hiking Time – 3 hrs 10 min up/ 2 hrs down; Drive on Forestry Services Road – ~44 min)
Elevation Gain: ~674m+ (2,211 ft) – although depends where you park
Max Elevation: 1671m at Hut (5,482ft)
When to do the Hike: year round
Overnight: Yes; but can be done in a single day; multi-day add-on’s can occur
Map of the Route & GPS data: Yes!! Click here for Route
Dog Friendly: Yes, but only if experienced with climbing mountains.
HK Plan: Overnight Hike
Items that are handy to know
- We did this hike during the snow melt fun in May; so we left early and hit the mountain before the sun started to melt. It got slushy fast. Snowshoes are optional this time of year, or just accept wet boots.
- Brew Hut is accessible during the winter and summer months. There are 2 routes and 2 forest service roads (FSRs) that can take you to the the hut. Both FSRs require high clearance 4 WD to the get to the trail-heads. Both routes merge at Brew Lake.
- Note – come snowfall, the Brew Creek FSR to Brew Lake Trail is not accessible; unless you’re feeling ambitious to add a few extra km’s of snowshoeing up logging roads to your trip.
- Brew Hut is maintained by the UBC-VOC, so registering for your groups stay is required/ helpful to let others know how many people are there & a fee of $10 to keep the hut in good is required. Link to Register/ Latest updates from VOC. Fees can be cash left in the blue box or sent via their Showpass Donation Page.
Fun Fact – Brew Hut offers an epic Panorama of Garibaldi + Black Tusk. As well, this is the Brew Hut Version 3.

The Drive
Getting to the trailhead for Mount Brew, regardless if it’s summer or winter route, is known to be problematic. It took us a while to figure out the route. And that was after we tried the summer route in the winter (we ended up snowshoeing along the road you drive up to only get to the trail head; then we realized there was a separate winter route access). So to make life easy, see the map and GPX coordinates above. Google Maps may be confusing. We drove in from Vancouver, so it took us approximately an hour and a bit to get to the forest service road.

Trail Head
- Highly recommend high clearance and 4WD.
- Especially during the spring time as the run-off creates some awesome runoffs to drive over.
- We parked about 1.5km from the actual trail head.
- The first little climbed was a good warm up. About 15 minutes and a few layers shedded, we were on the actual trail.
- We started around 10:10am.

Forest to Brew Lake
- At the trail head, you kick up along the rocky path to cut up towards the forest. At the start there was next to no snow.
- Rocky climb up until you reach the forest. When we did the hike, there was minimal / no snow up until half way through the forest area.
- While maneuvering through the forested region, it was pretty much make your own route/ follow the markers to a certain degree.
- Access during the snow melt period is limited to what seems to be the most compacted area of snow.
- Around 11:20ish we were nearly the dense trees started to be more spread out and we were entering a more open space. The sun coming down, definitely made the hike through the snow much more fun.
- Continuing, the amount of snow increased. We went from seeing full size trees, to just the tree tops. A lot of snow to melt.
- We reached Brew Lake around 12:15ish. The lake was mainly frozen except for a couple of small spots. It felt like we were in a twisted sort of winter wonderland, hiking through the snow in t-shirts and shorts.


Brew Lake To The Hut
- After enjoying a brief break overlooking the frozen/ partially melted lake, we opted to make our own path up to the Hut.
- At this point with the sun melting, the trek started to turn into more of a slog as the frozen snow began to melt. It’s a short and sweet climb heading west from the lake up the ridge to the hut.
- There’s a smaller unnamed lake further up beyond the ridge we had to maneuver around. Beyond that, there was enough snow the trees were still fully covered so it was a make your own path sort of scenario.
- Up and around the last climb, we were welcomed by Brew Hut, the 3rd.


Brew Hut
- Brew hut is a cozy space. The cabin is exposed to the sun on all faces so it stays warm extremely well overnight.
- The beauty of staying at this location, is you are treated to sunrise and sunset views.
- Note – in May, it is still very chilly at the hut. Layers are highly recommended.
- After enjoying an incredible sunset. We hit the upstairs of the hut for sleepy time.


Get out there and explore! Follow us on instagram at:
Reply
You must be logged in to post a comment.